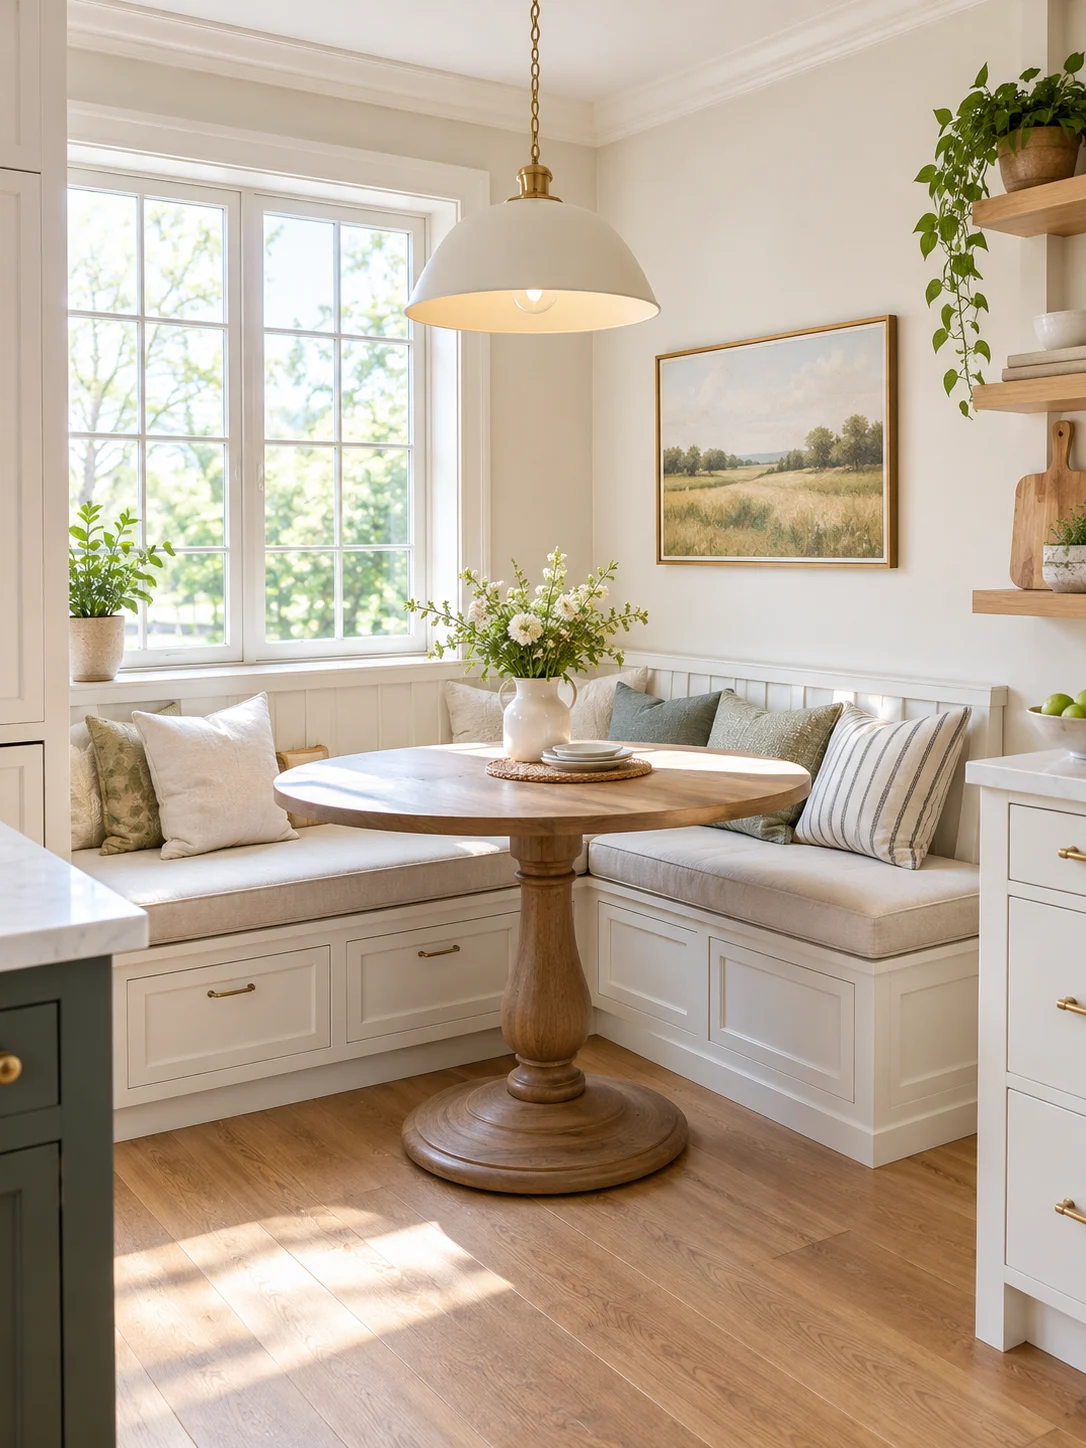
Built in banquette seating can turn a crowded, awkward dining area into the spot where everyone wants to sit. Instead of pulling out four chairs and squeezing past each other, you slide onto a bench that hugs the wall and stay as long as you like. If your table feels too big for your room, or your corner only collects baskets and a tired houseplant, this setup might be the fix.
In this guide, you will learn where to place a banquette, how to use natural light, and how to add a cozy window chair on the table’s open side. You will also get exact banquette seating dimensions, rough costs, building steps, fabric tips, and answers to the questions people ask most. Let’s start with the basics.
What Is a Banquette and Why Choose a Built In?
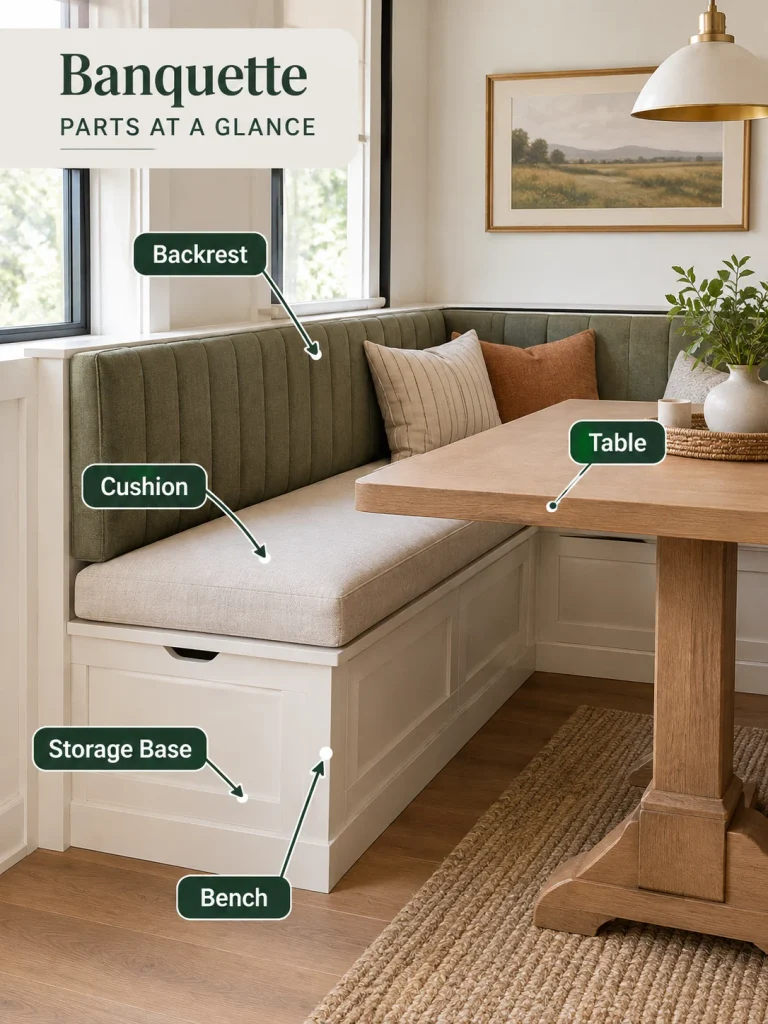
A banquette is a long, upholstered bench fixed against a wall and paired with a table. A built in banquette is attached to the room itself, so it looks like part of the house instead of a loose piece of furniture. Think of the cozy booth in your favorite cafe, but made for your kitchen or dining room.
How Built In Banquette Seating Differs From a Regular Bench
A freestanding bench can move around, which is great for renters. Banquette built in seating stays put. It is framed to fit your wall, your floor, and your table, and the edges usually run wall to wall for a clean, custom look. A built in design also lets you tuck storage inside the base, which a plain bench rarely does.
Why It Saves Space
Every dining chair needs room to slide back, and that wasted space adds up fast. A banquette skips it. You slide in, settle, and stay put. In many small kitchens, swapping chairs on one side for a wall bench frees up a foot or two of walkway.
It also seats more people. An L shaped banquette along two walls can often seat five or six, and a long straight bench can fit four with chairs across from it for two more.
There is a safety bonus too. If a table sits close to a window, kids who tip their chairs back can bump the glass. A bench against the wall removes that risk and keeps the view open.
Where to Place Built In Banquette Seating
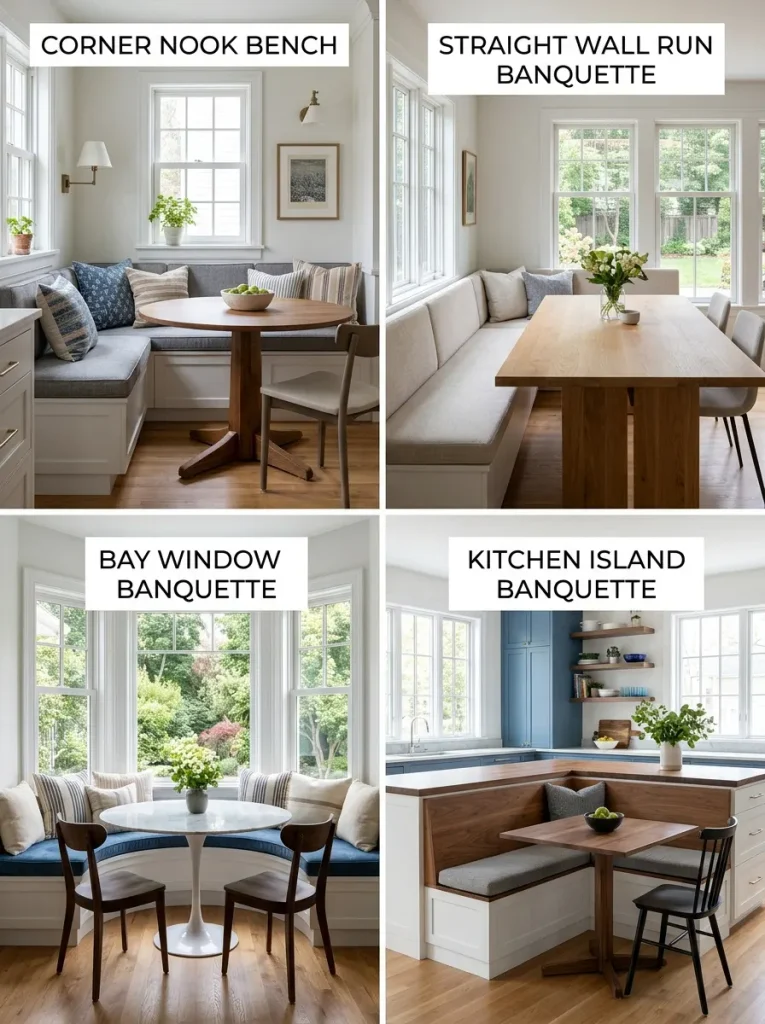
Placement decides whether you love your banquette or just tolerate it. Start by looking at your room’s corners, windows, and traffic paths. Here are the layouts that work best.
The Classic Corner Nook Bench
A corner nook bench is the most popular choice, and for good reason. It turns dead space into prime seating. The wall behind you and the bench beneath you create a snug pocket, so guests tend to linger long after the plates are cleared.
The people in the middle get cuddled in a little, but the corner seat is usually the one everyone fights over. If you only have one wall to spare, many designers still prefer an L-shape to a straight line because it feels more inviting.
A Straight Run Along One Wall
Not every home has a handy corner. A straight bench along one wall works well in a narrow or galley kitchen, since it keeps the walkway clear. Pair it with two chairs on the opposite side, and you can seat up to six.
For a built-in look, run the bench from wall to wall. Clean edges make it feel custom, like a tailored suit instead of one off the rack. Painting the wall behind it a soft color, such as dusty sage or creamy white, makes the whole setup look calm and planned.
Under a Window or in a Bay Window
A bay window is practically begging for a banquette. The curved nook wraps around the table, so you can seat six or seven people without adding a single extra chair. Morning light spills over the cushions, and your coffee somehow tastes better there.
A curved bay takes a skilled carpenter, so expect custom banquette seating costs here. The payoff is a room people remember. Add storage underneath and you solve two problems at once. If you have a plain flat window instead, a straight bench beneath it still gives you light, a view, and a spot to read.
Built Into a Kitchen Island
Some kitchens tuck a bench against one side of the island, which creates casual seating for breakfast and homework. It works best in open plan homes where the island already anchors the room. Heights and legroom need careful planning, so we cover the pros and cons in the FAQ below.
A Curved or Booth Style Banquette
Curves are friendly. A rounded banquette lets everyone face each other, which makes dinner more social. Booth style seating, with a tall back and a round table, gives you a true restaurant feel at home. Both usually need custom work, but they make a bold statement.
A Banquette as a Room Divider
In an open plan space, a banquette with a back facing the living area can act as a soft divider. It marks the dining zone without building a wall, and you still keep sight lines across the room. This idea is less common, so it can set your home apart.
Leave Enough Room Around It
Whatever layout you choose, give people space to move. Plan for about 36 inches of walking room around the open sides of the table. Tape the outline of the banquette and table on the floor first. Walk around it, sit on a stool, and see how it feels before you commit to any wood.
Natural Light, Lighting, and a Cozy Window Chair
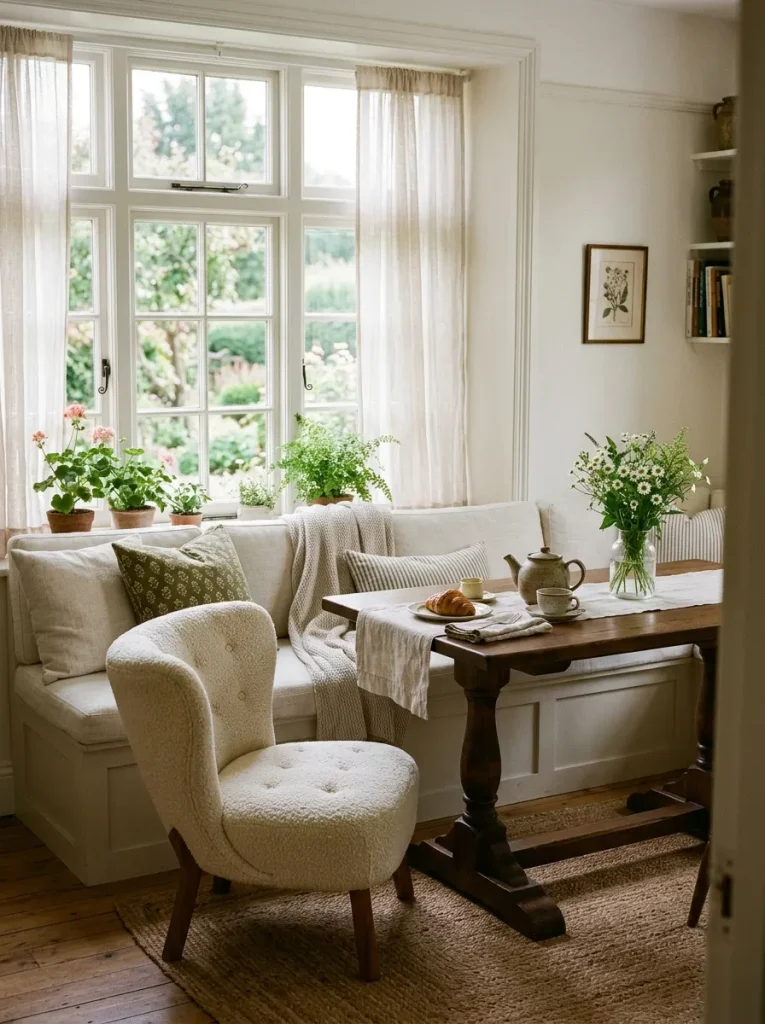
Light shapes how a banquette feels more than most people expect. A spot with good daylight feels open and fresh. A dark spot can feel like a cave unless you plan the lighting well.
Use Natural Light on Purpose
If your banquette sits near a window, treat that window as the star. Keep window coverings light and airy, such as sheer linen, so the view stays visible. Use a slim, low backrest, about 30 inches from the floor, so the bench does not block the glass or the glow.
Light colors on the walls and trim bounce daylight deeper into the room. Pale oak, white, and soft cream all work well. A mirror on a nearby wall can also stretch the light.
Two cautions help here. First, strong sun fades fabric over time, so choose a performance fabric and consider a sheer curtain. Second, bright sun shows every paint flaw. One DIY builder said she wished she had used a better quality front panel because the paint looked uneven in full sun. Sand well, fill every gap, and use good plywood.
Layer Artificial Light for Evenings
When the sun sets, a flat ceiling light can make dinner feel like an interview. A pendant light over the table fixes that. Hang it about 30 to 36 inches above the tabletop so it does not block anyone’s view. Put it on a dimmer, so it can be bright for homework and soft for dinner with friends.
If you can, add a small wall sconce beside the bench. That little pool of warm light turns the banquette into a hideaway.
Add a Cozy Window Chair
Here is a detail many guides skip. A banquette fills one side of the table, but the open side is a chance to add a cozy window chair. Place one upholstered chair at the end of the table, close to the window, and you create a second mood in the same space.
Use it for morning coffee, a quick phone call, or an extra seat when guests arrive. A small armchair with a low back and soft arms works well. Add a throw blanket and a slim side table, and the corner becomes a reading spot.
Keep a few things in mind:
- Choose a chair with a light visual weight, such as thin legs or a woven seat, so the room does not feel crowded.
- Leave at least three feet between the chair and the bench so people can walk through.
- Match the chair’s fabric to a color in your cushions, but do not match it exactly. A little contrast looks more collected.
If your open side has regular dining chairs, pick ones that slide fully under the table. When it is just two of you, push them in and the room feels open. When friends come over, pull them out and you can seat eight.
Banquette Seating Dimensions That Work
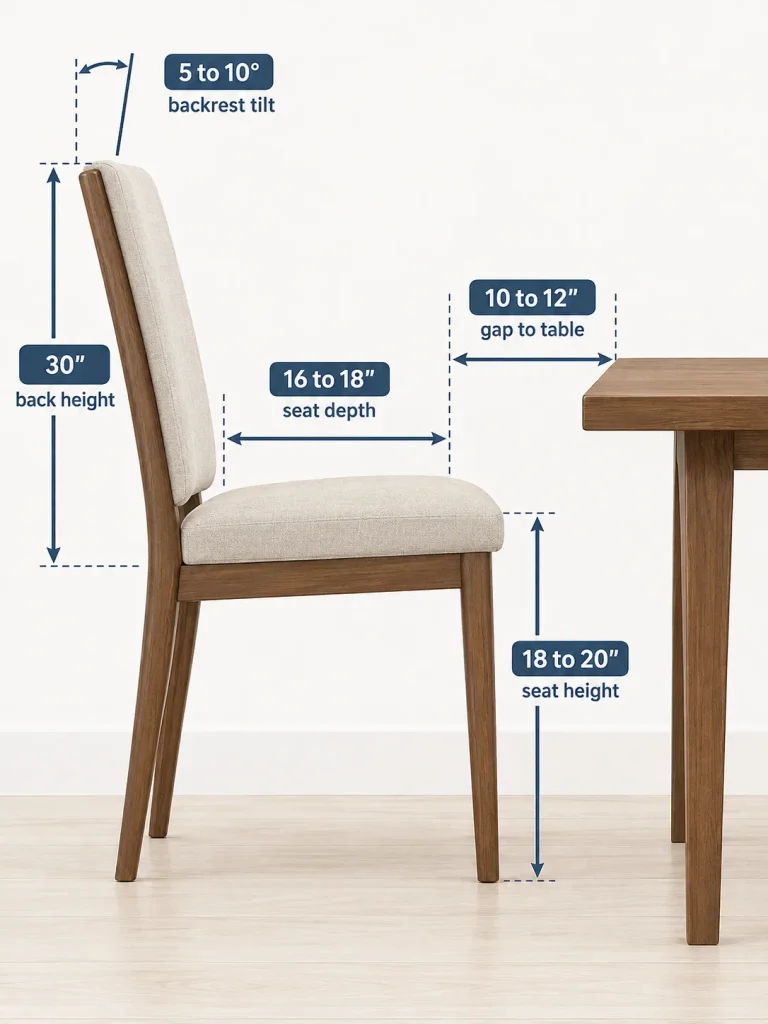
Good numbers make the difference between a bench you love and one that gives you a sore back. Here are the banquette seating dimensions most builders use as a starting point.
- Seat depth: 16 to 18 inches for dining. Lounge style benches can run 20 to 24 inches deep, which is lovely for reading but uses more floor space.
- Seat height: about 18 to 20 inches with the cushion. Measure your dining chairs and use that height as a guide. If your chair seats sit at 18.5 inches, aim close to that.
- Width per person: about 24 inches. That gives elbow room without feeling stuffy.
- Gap between bench and table: 10 to 12 inches so people can slide in and out.
- Backrest height: about 30 inches for a low, open look, or 36 inches and up for a booth feel.
- Backrest angle: a slight tilt of 5 to 10 degrees. A perfectly vertical back gets uncomfortable fast.
- Cushion thickness: around 3 inches. Thicker feels plush but can push the seat too high.
- Table height: a standard table is 29 to 30 inches tall, so check that your seat height leaves enough knee room.
One more tip. If your seat is too deep, feet dangle like kids at a grown up table. If it is too shallow, you feel like you might slide off. When in doubt, build a cardboard mock up and sit in it for a full meal.
Custom Built In vs DIY: Costs and Options
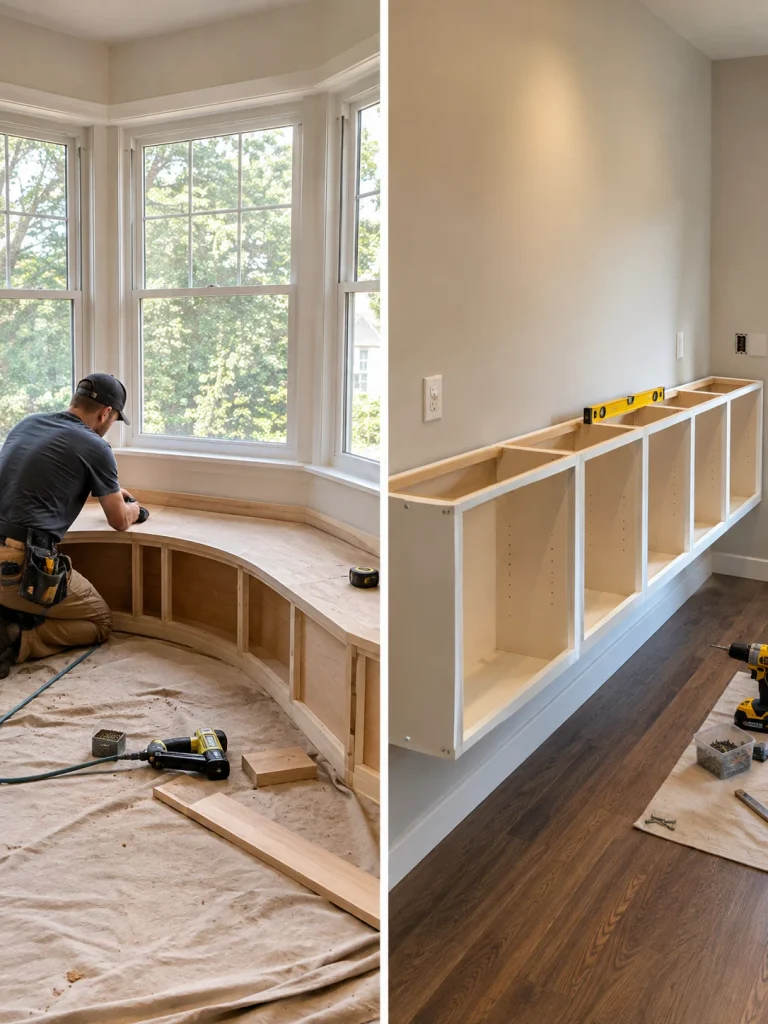
You have several ways to get a banquette. The best one depends on your budget, skills, and room shape.
Custom Built In Banquette Seating
A carpenter or cabinet maker builds custom built in banquette seating to fit your exact space. This is the best route for bay windows, curves, and tricky corners. It also gives you a polished finish and the choice of hidden storage. Prices vary a lot by region and materials, so get at least two quotes and ask what is included, such as paint and upholstery.
DIY Banquette
Building it yourself costs much less. One popular tutorial reported about $200 in lumber and supplies for a bench around 10 feet long. Fabric, foam, and batting added about $100 more. Later, the builder paid to have leather cushions sewn, which she said would cost at least $600. These numbers are from 2022, and lumber costs change, so treat them as a rough guide and check today’s prices.
You can save more by attaching the bench to the wall instead of building a full box on the floor. That cuts the wood needed for the back side.
The Cabinet Box Hack
Here is a clever shortcut. Line up stock cabinet boxes from a home store, or reuse spare kitchen cabinets, and secure them to the wall studs. Add a plywood top, trim the front with baseboard, and caulk every seam. Paint it the same color as the wall and it looks fully custom.
Because cabinets already have doors or drawers, you get storage built in. Just measure the total height with the cushion first, so the seat still matches your table.
Ready Made Options
If building is not your thing, look at a banquette dining set. These sets pair a bench or corner seat with a table, and they are easy to move. A dining room table bench or a dining room bench seat is another simple option, and many stores sell Benches and Banquettes in the same section. You will not get the wall to wall built in look, but you will get the space saving benefits.
How to Build a Basic Banquette Seat
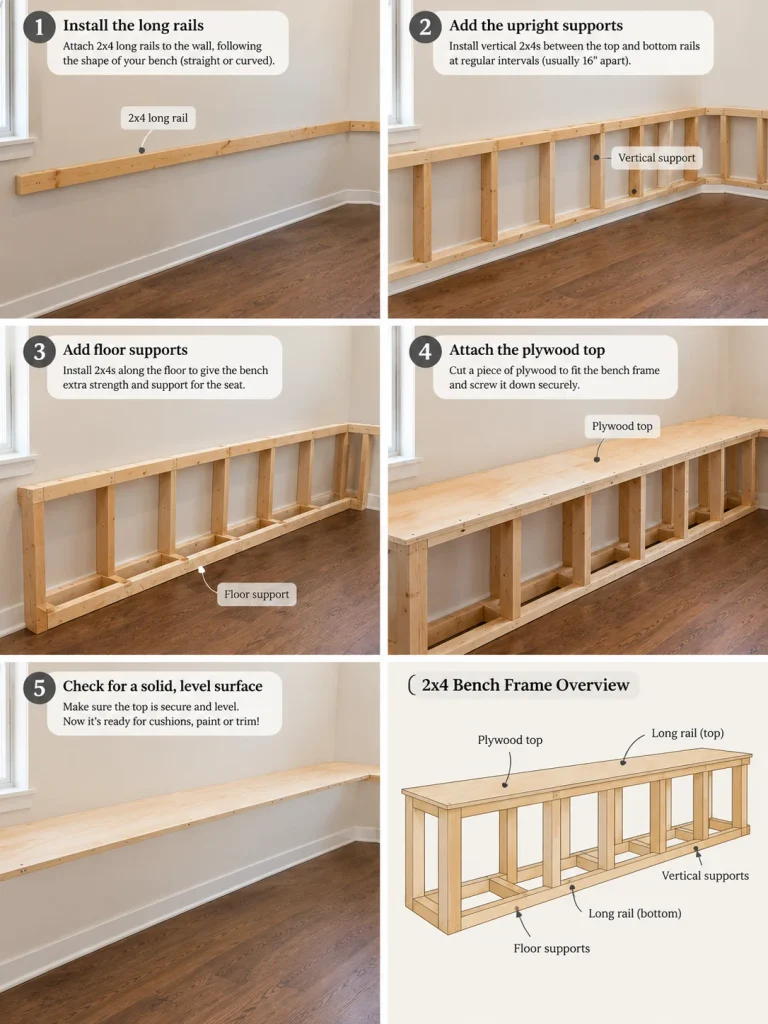
This is a simple overview based on a common 2×4 frame method. Sizes will change for your room, so measure twice.
- Measure and plan. Measure the wall, note any bump outs, and decide on the seat height. Remember to count the plywood top and the cushion.
- Check the wall. Use a stud finder, and make sure no pipes or wires run where you will drill.
- Cut the frame. Cut two long 2×4 rails for the front and two for the back, each about one inch shorter than the wall so they fit easily.
- Add supports. Attach upright supports and floor supports between the rails, spaced about 16 inches apart. Use wood glue plus screws or a pocket hole jig.
- Attach the top. Use three quarter inch plywood or particle board. Many stores will cut it to size. For odd shapes, make a cardboard template first and trace it onto the wood.
- Cover the front and sides. Add quarter inch plywood panels, then trim to make it look finished.
- Fill, sand, and paint. Fill holes with wood filler, sand, prime, and paint.
- Add the seat. Staple foam, batting, and fabric over the top, or make removable cushions.
Here are a few troubleshooting tips from real builders. Drill pilot holes first, because screws can stall when they hit a second piece of wood. Charge your drill battery, since a weak one makes screws stop halfway. Use screws on the 2 inch side of a 2×4 and a pocket hole jig when you need to join through the 4 inch side. Finally, wear eye protection and ask for help when lifting long boards.
If you cover the seat with fabric, expect to replace it someday. Zip off cushions are easier to clean or swap, which is why many people prefer them.
Add Banquette Seating With Storage
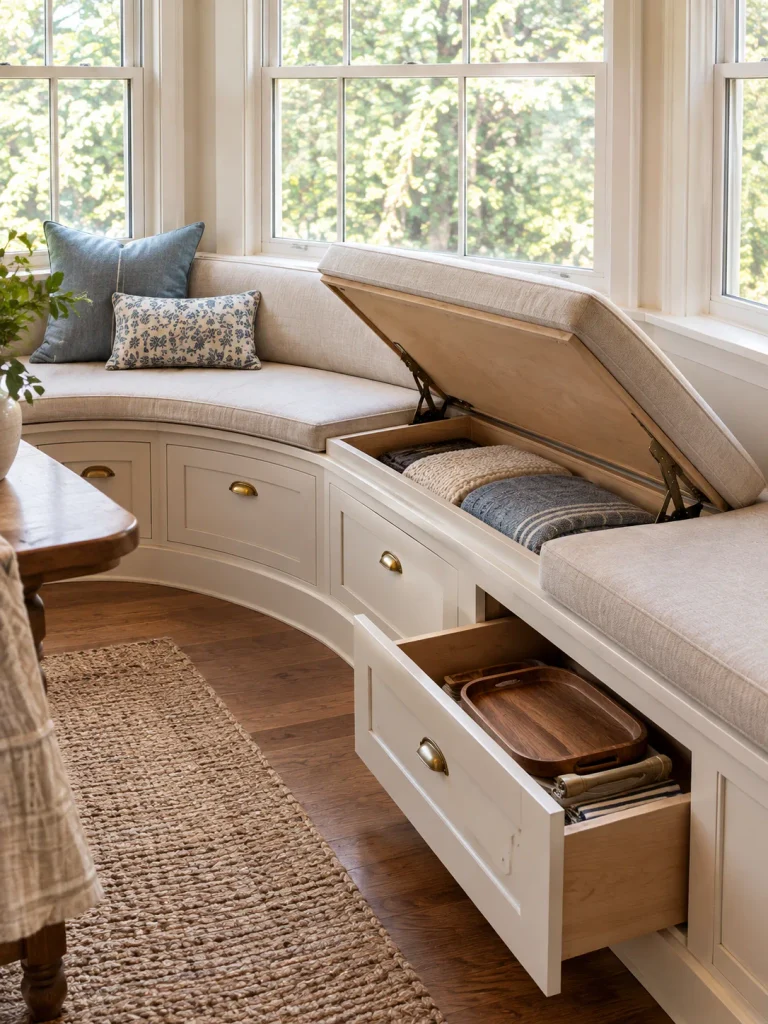
Banquette seating with storage might be the best reason to build one. The base of the bench is a big, empty box, and it is perfect for things you rarely use but still want close, such as holiday linens, extra candles, a fondue set, and serving trays.
You have two main styles to pick from. A hinged lid lifts up like a toy chest and is the easiest to build. Deep drawers slide out from the front, so you never have to move anyone off the seat to grab a tablecloth. Drawers cost more but are worth it for everyday items. Soft close hardware makes a gentle glide that you will enjoy every time.
Before you build, plan around heating vents, radiators, and outlets. Blocking a vent can trap heat and cause damage to the cushions, so leave room for air to move.
Pick the Right Table and Seat Cushions
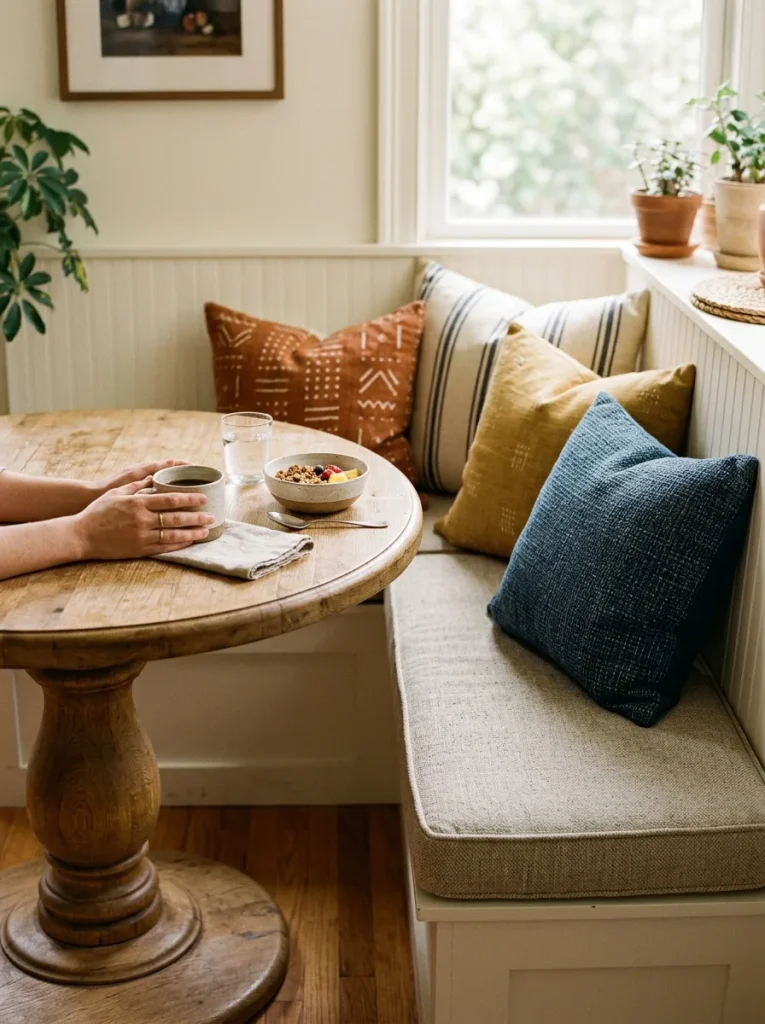
Your table matters as much as your bench. A great banquette with the wrong table can feel cramped and clumsy.
Choose a Banquette Table That Fits
A round or pedestal banquette table is the favorite for corners. With no legs to dodge and no sharp edges, people can slide in from any angle, and squeezing in one more guest feels easy. An oval table is a good choice along a longer straight bench. A rectangle works too, but corner legs can bump knees, so choose one with legs set in from the ends.
Choose Fabrics That Handle Real Life
Spills will happen, so choose a fabric that can take them. Performance fabric feels soft but wipes clean with a damp cloth. Faux leather and real leather give a polished bistro look and are easy to wipe. Solution dyed acrylic is another tough pick, and outdoor fabrics work indoors too, especially in busy family kitchens.
Colors that hide life a little, such as oatmeal, warm gray, or muted blue, are forgiving. If you love bold color, designers say mustard yellow, electric blue, and hot pink are becoming more popular. Skip very delicate fabrics unless you are a very tidy person.
Layer in Pillows and Texture
A bare bench can look stiff, and pillows fix that. Mix square pillows with long lumbar ones. Blend textures like velvet, chunky knit, and cotton for depth. Stick to three or four colors so the look stays calm. Swapping pillows with the seasons, such as rust and mustard in fall and blush and cream in spring, makes the nook feel new for almost no money.
Banquette Seating Ideas by Style
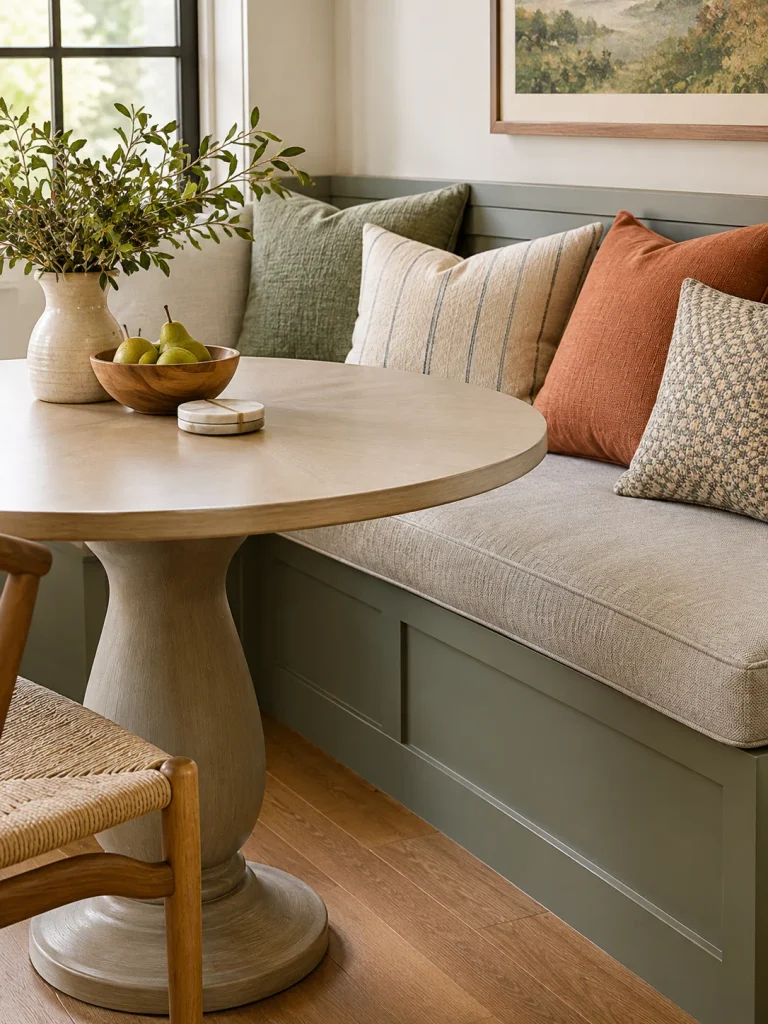
Still picking a look? These Banquette Seating Ideas show how flexible the style can be.
- Simple country style: A painted wood bench with colorful cushions. It saves money on fancy upholstery and still feels warm.
- Restaurant booth: A tall tufted back, leather seats, and a round table for a night out feeling at home.
- Modern and bold: A solid color cushion in a strong shade against white walls and slim wood legs.
- Vintage mix: A modern bench paired with an old wooden table or rug for a layered, high end look. One builder even found her vintage table at a local home improvement reuse store for about $100.
- Built in banquette seating dining room style: A long bench with trim on the front, a pendant light above, and a framed art piece on the wall behind.
Whatever style you choose, keep the pieces balanced. If the bench is bold, keep the table and chairs simple.
Common Mistakes to Avoid
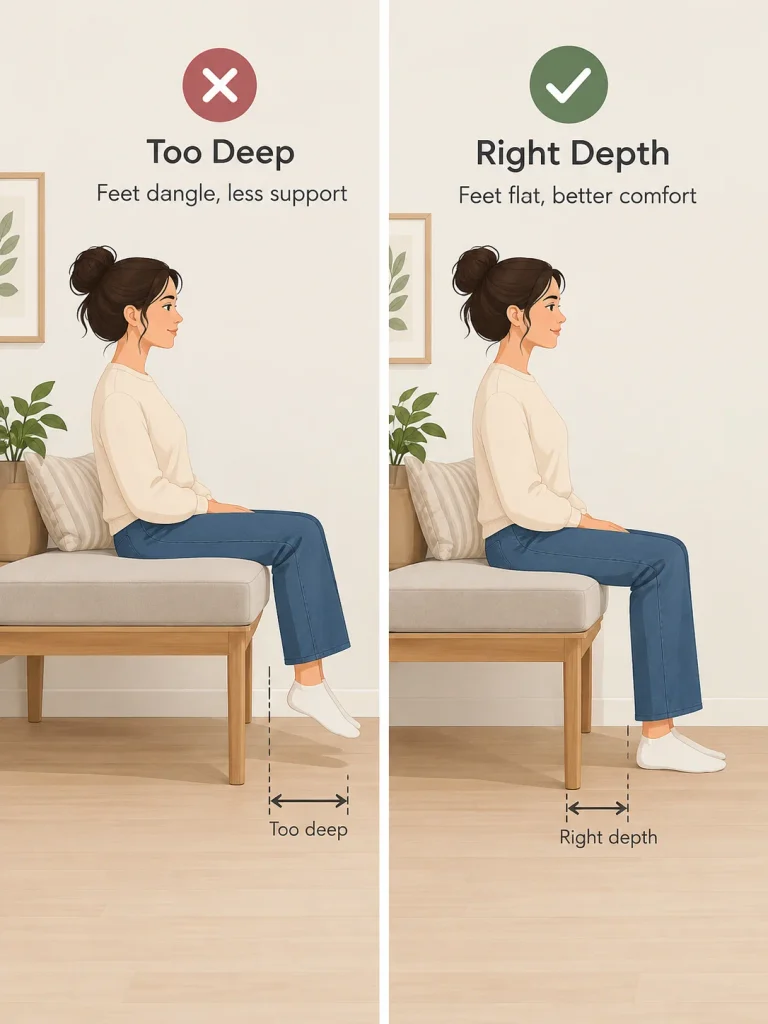
A few small errors can ruin a good plan. Watch out for these:
- Building the seat too deep or too tall, which leaves feet dangling or knees jammed.
- Using a perfectly vertical backrest, which gets uncomfortable fast.
- Forgetting to leave room to slide in and out.
- Blocking heating vents or outlets under the bench.
- Choosing delicate fabric for a home with kids or pets.
- Skipping the caulk. Filling every seam is what makes a budget build look custom.
Frequently Asked Questions
How do you build banquette seating with built in storage?
Start with a sturdy wooden frame and choose either a hinged seat or pull-out drawers for storage. Attach a piano hinge and soft-close lid support for easy access, or install full-extension drawer slides. Finish with a comfortable cushion and check the seat height with the cushion in place.
Banquette seating built into kitchen islands: love or hate them?
Banquette seating in kitchen islands creates a cozy spot for breakfast, homework, and casual conversations while saving floor space. However, island height, legroom, and cleaning can be challenging. Plan for at least 12 inches of counter overhang and choose easy-to-clean cushions for better comfort.
What are the best kitchen renovation and design ideas to pair with banquette seating?
Pair banquette seating with a bay window nook, corner bench, curved seating, or a kitchen island dining area. Add pendant lighting, durable cushions, practical storage, and easy-to-clean flooring. Plan the seating during renovation to ensure proper space, lighting, and electrical outlets.
What size should banquette seating be?
For comfortable banquette seating, aim for a seat depth of 16 to 18 inches and a height of 18 to 20 inches, including the cushion. Allow 24 inches of width per person, 10 to 12 inches between the seat and table, and a 5 to 10-degree backrest tilt.
Does banquette seating really save space?
Yes, banquette seating saves space because wall-mounted benches do not need extra room to slide back like traditional chairs. It also accommodates more people in a smaller footprint, making it ideal for compact kitchens and dining areas.
Ready to Plan Your Banquette?
Built-in banquette seating adds comfortable seating, extra storage, and a cozy dining area to your kitchen. Measure your available space, choose a custom or DIY design, and test the layout before installation. A well-planned banquette can make everyday dining more practical and inviting.
Conclusion
Built-in banquette seating gives your dining room more seats, smarter storage, and a spot people truly want to sit in. The right placement makes the room flow, natural light makes it feel open, and a cozy window chair adds a second mood to the same table. Good dimensions keep everyone comfortable, while the right fabric keeps it looking fresh through real life.
Whether you hire a carpenter for custom banquette seating, try the cabinet box hack, or build a simple frame yourself, the plan starts the same way. Measure your space, tape the outline, and test it. Then pick your path and start building. Your favorite seat in the house is closer than you think.